Blender Hotkeys you must know
Center Pivot Point to Object
Object Mode (Press Tab to switch between Object and Edit Mode)
- Select the Object
- Right Mouse Click
- Set Origin to –> Geometry
Object, Set Origin, Origin to 3D Cursor
Blender Isolate Object
- Shift+H to isolate the object
- Alt+H to Exit the isolate model
Blender Hide Object Shortcut
- Select Object
- Press H
- Press Alt+H to unhide all
Blender Clean Up Mesh
- Select the Object
- Edit Mode
- Press A to Select All
- Tab–>Mesh–>Clean Up–>Merge by Distance
Blender Recalculate Normals
- Select Object
- Pres Tab for Edit Mode
- Press A to Select All
- Press Alt+N
- Select Recalculate Outside
Blender Join Geometry
- Select Objects
- Press Ctrl+J to join objects
Join & Separate Mesh
Blender Separate Geometry / Faces
- Select Object
- Press Tab for Edit Mode
- Select Faces
- Press P
Blender How to Scale the GUI
- CTRL+Press Middle Mouse Button
Blender Subdivide Hotkey
- Ctrl+1,2,3,4 (etc. not NumPad)
Blender Boolean Hotkey when using Addon Bool Tool
- Ctrl+(-) minus on Numpad
Blender Statistics
Overlay, Show Statistics

Blender UVW Unwrap
Select Object, Edit Mode, Faces, Right Mouseclick, UV Unwrap Faces
Tris to Quads
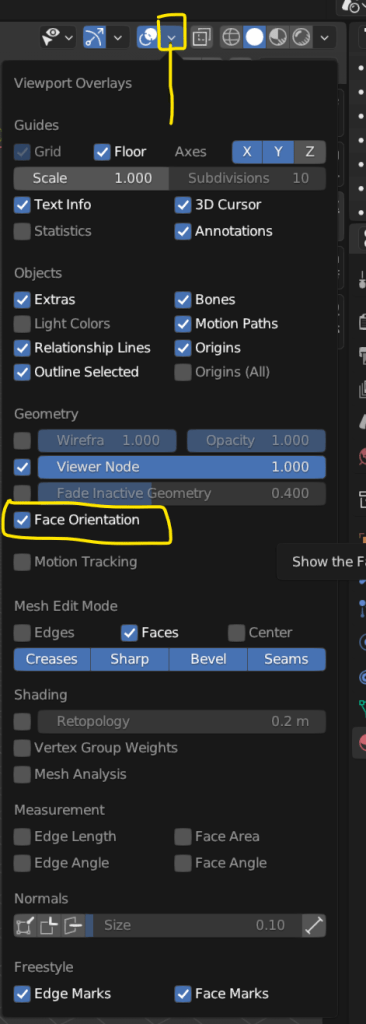
Show Normals
Select the Overlays –> Geometry –> Face Orientation
Change Normals Direction
- Select the mesh –> Edit Mode (using vertex, edge or face)
- Select the Faces you would like to flip the Normals
- from the Mesh menu upper-left click Normals (ALT+N)
- then Flip
- Mesh » Normals » Flip
Fill Hole (Cap)
Click the surrounding vertices’s or edges then F will fill the hole
How To Delete Blender Materials
Create a Blender PBR Material
Detach Rig from Mesh
Select the Mesh you want to detach from the RIG. Click ALT+P
Select and Center Object in Viewport
Select the object in the viewport, Click the “.” Period Point on the Numpadto center the object in the viewport
Move Objects into a Different Collection
Select the Object, press “M” shortcut for Move and select the Collection you want to move your selected object
Viewport Shading

Select Collection and Move the Group / Collection Together
- Select the Collection within the Outliner
- Right Mouseclick–> Select Objects
Look through a selected Camera
- Select the Camera–> Click the “0” on the Numpad
- Make the selected Camera the Active Camera: Select the Camera –> Click CTRL + Numpad “0”
- https://youtu.be/aY04h4ujrlY?feature=shared&t=113
Navigate via the selected Camera
- Select the Camera and Click SHIFT+` (Tilt)
Once selected, you can navigate or move the camera with WASD. IMPORTANT: To keep the last Camera Position, you need to CLICK+LEFT MOUSE BUTTON. When clicking the Right Mouse Button, it abbords the current camera position and jumps back to the previous one.
Then Click Esc to get out from the active Camera Mode.
Change the Camera Speed
- Scroll the Middle Mouse Button Forward or Backwards to change the speed
- By clicking the Middle Mouse Button, you hyper-jump with your camera to the selected object
Camera User Mode
When being in the Camera User Mode, you can do the same with SHIFT+` (Tilt) Key to use your Camera User Mode with the “Fly” Mode (WASD).


Visible Edge Highlights in Viewport

Shade Smooth
- Select your object –> Right Click–>Shaded Smooth

- Inset Faces (Individual): Double Click “i”
- Move Edge along Normals: Press “G” Twice

Selection Faces, Edges, and Loops
Depending on the Mouse Position of a selected Face (Left, Right, Top or Down) the loop selection will be created, when clicking ALT+Left Click and Select.
Welding Vertex Points
Edit mode–>Vertex–>A (to select all vertices)–>M for Weld–>by Distance–>Select the Distance
Select Hidden Faces (Backface and Select Through)
- Toggle Xray Mode when selecting.

Material Editor / Shader Object
Display Objects as Bounds
- Viewport Display (Wire, Bounds, Solid, Textured)

Add-Ons:
- Bool Tool
- Machine Tools: https://machin3.gumroad.com/
Layout Editor Type
AO and Composite
Scale Uniform
- Hit “N” –> Item Tab
- Object Mode –> CTRL A –> SCALE
UVW Unwrapping with Seams
- Similar to Zbrush, you define with SEAMS UVW Islands to unwrap them.
- Edit Mode –> Select –> Sharp Edges
- Sharp Angle –> Set to 30 Degree (This selects all Sharp Edges up to 30 Degree)
- Click CTRL + E –> Mark Seam
All Selected Sharp Edges are now DEFINED as SEAMS


Normal Map Faceting
The Normal Map Color Space needs to be set to Non-Color, to not have any artifacts / faceting issues in the Cycles render. The Image Node for the Normal Map needs to be set to non-color data.


Glass Refraction Dispersion
Boolean
- First Select the Piece you want to use to Cut (Cutter)
- Then SHIFT+CLICL to select the piece you would like to Cut
- CTRL+SHIFT+B
- Brush Boolean–>Difference

Addons – Loop Tool

SUPER SHORTCUTS MODELING
- E – EXTRUDE
- ALT+E (Extrude + select Type of Extrusions)
- I – INSET
- CLICK I – TWICE (Inset single faces)
- CTRL+B (Bevel)
Dissolve Floating Vertices
- Select one of the vertices that you want to remove.
- SHIFT+G or Choose Select > Similar > Amount of Adjacent Faces
- Deselect any vertices that have been selected but that you don’t want to delete (in this case, the corners) and choose Mesh > Delete > Dissolve Vertices to delete the unwanted vertices.

- Mesh–>CleanUp–Limited Dissolve
Sculpting
Loop Cuts and Middle MouseWheel
- Select the Object
- Tab–>Edit Mode
- CTRL+R (Hover over the faces and edges and position your YELLOW LINE where you want to make the cut)
- DO NO TPRESS THE LEFT MOUSE BUTTON
- SCROLL THE MOUSE WHEEL UP AND DOWN TO CHANGE THE LOOP CUTS INCREMENTS
- one, two, three, or as many as you want. Once you have your loop cut number –> LEFT MOUSE CLICK
- after the first LEFT+MOUSE CLICK you can now slide the cuts
- Left Mouse click Again to apply
- Left Mouse click Again to Exit
IMPORTANT:
IT WILL NOT WORK WHEN YOU CLICK ON THE TOOL TAB BAR and select the LOOP CUT From there. Recommendation: Just don’t do that, and always use the ShortCut CTRL+R
EXTRUDE = CTRL + RIGHT MOUSE CLICK
Set 3D Cursor
Shift+Right-click
Setup PBR Shader Network
- Select your Principal BSDF Render Node
- Click CTRL+SHIFT+T
- Select your PBR Textures
- Click Principled Texture Setup

GRID FILL
Closing a hole or a gap. Additional to F you can click CTRL+F –> Select Grid Fill
DELETE MATERIALS
Mirror Selection
Select –> Select Mirror (Shift+CTRL+M)
Mirror Center with no Face
Hit “B” for boundary, on/off
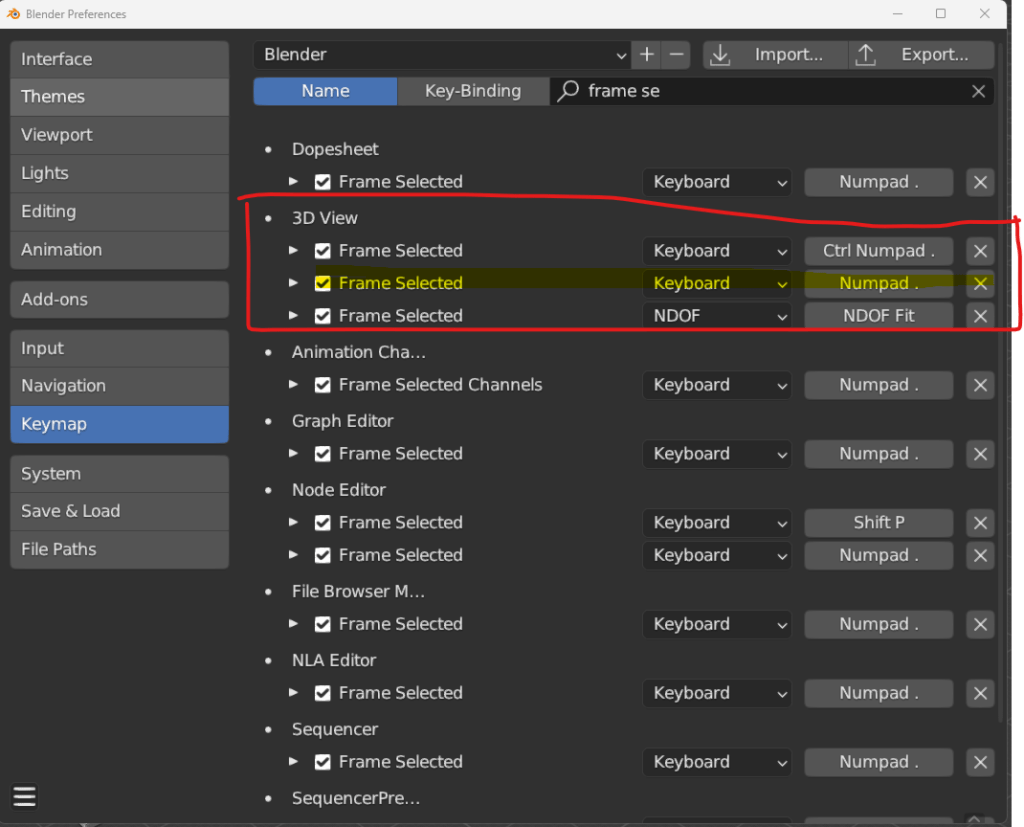
Show Gizmo
Numpad .
Frame Selected

SCALE UNIFORM
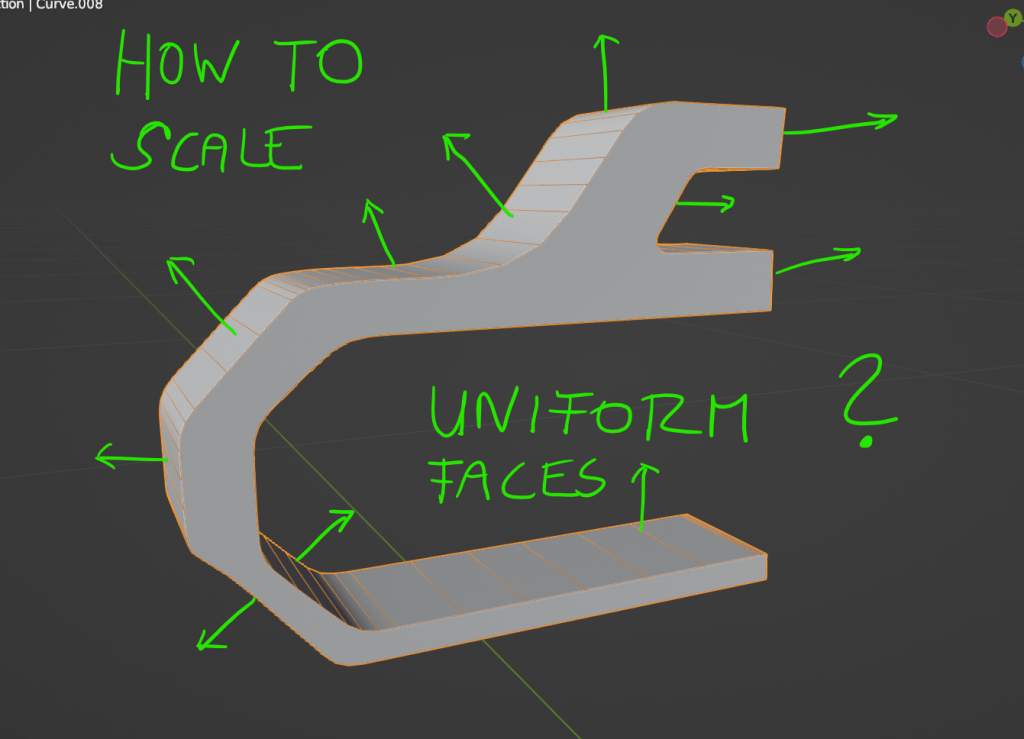
When you perform the SCALE operation, by pressing FIRST “ALT” and then Click “S” once. That’s it.
Machine Tool
(10) MACHIN3tools Explained in 8 min – YouTube
Select Similar Verts and Delete them
Select the Vert –> Select Similar–> Amount of Connecting Edges or Shift + G
Inset Straight Skeleton
CTRL+F –> Inset Straight Skeleton
Armature – Parent the Armature to your character
- Select your Character
- Shift+Seelct your Armature
- CTRL+P
- Set Parent –> Armature Deform –> With Automatic Weights
EDGES
Non-Manifold
Tab Pie Edit Mode
It’s the Plugin Addon called MACHINE3Tools. Addon Purchased, and uploaded to my drive.