
This is the start of my personal documentation using Unreal UE4 for VR Game Development for Oculus Quest. I am trying to collect as much valuable and practical content as possible. The goal is clear. Get the best graphics, best performance & best immersive experience when using Unreal UE4 for the Development Tool.
How to build Applications for Oculus Quest using Unreal Engine UE4
If you are using Unreal UE4 to develop Oculus Quest Applications – then you came to the right resource. My name is Bernhard Rieder, and I am a 3D Visualizer and VR Developer for Oculus Products. My VR-Blog FattyBull is a learning and tutoring resource for Developers, 3D Artists, and Creative Heads interested in creating & building immersive experiences, games & stories using Unreal Engine UE4.
On my Blog, I am documenting step by step what tools you need to develop your own VR application for Oculus Products. Specifically for the Oculus Quest, using Android and ES3.1 it can be very challenging to deploy applications with maximum performance and quality. That’s the challenge – that’s the task. Welcome to my blog and this journey – having fun creating the best viewer experiences possible. Great to have you here – now let’s get started with the basics.
How to connect your Oculus Quest with your PC (USB3 vs. Link Cable)
Using your USB3 Cable: First of all, you can just use a standard USB3 cable to connect your Oculus Quest directly to your PC. I also recommend doing this first – so you’ll get familiar with the USB3 Connection to your PC. Typically it will pop up as Quest and you can access the files by using your Windows Explorer. The folder structure of your Quest Device will look like the screenshot below:


When you use Unreal UE4 to develop for the Oculus Quest, you actually do NOT need anything else besides the USB3 connection. After your device is set up and all essential drivers are installed, you can directly deploy your Unreal Project to the Quest Device. Find below more detailed information about needed Drivers for PC to Develop with Unreal UE4 for Oculus Quest.
Once an application is deployed to your Oculus Quest Device, it can be launched within your VR Dashboard. Library→ Unknown Sources

How to connect the Oculus Quest to your PC using the Link Cable
First of all, you need to download and install the Oculus VR Software to your PC. The latest installation files can be downloaded here: https://www.oculus.com/setup/
After installation, launch the application and sign in with your username and log in.
Please keep in mind: You need to have a specific Graphic Card that supports the Oculus Link Cable. Only if your GPU is supported, is the Oculus Link Connection works. Once your Quest is connected to your PC using the Link Cable, you are no longer operating the Quest with your integrated Android OS.
In fact, the whole purpose of using the Oculus Link is to use the power of your PC and its built-in GPU card. Once this is set up, your Oculus Quest Dashboard will look different. It will launch the Oculus VR Application from your PC. Please find a list of supported GPUs below.
Supported GPUs for Oculus Link Beta
| NVIDIA GPU | Supported | Not Currently Supported |
| NVIDIA Titan Z | X | |
| NVIDIA Titan X | X | |
| NVIDIA GeForce GTX 970 | X | |
| Desktop NVIDIA GeForce GTX 1060 | X | |
| NVIDIA GeForce GTX 1060M | X | |
| NVIDIA GeForce GTX 1070(all) | X | |
| NVIDIA GeForce GTX 1080(all) | X | |
| NVIDIA GeForce GTX 1650 | X | |
| NVIDIA GeForce GTX 1650 Super | X | |
| NVIDIA GeForce GTX 1660 | X | |
| NVIDIA GeForce GTX 1660 TI | X | |
| NVIDIA GeForce RTX 20-series (all) | X |
| AMD GPU | Supported | Not Currently Supported |
| AMD 200 Series | X | |
| AMD 300 Series | X | |
| AMD 400 Series | X | |
| AMD 500 Series | X | |
| AMD 5000 Series | X | |
| AMD Vega Series | X |
How to set up an Oculus Developer Account

How to set up an Oculus Organization for Development
Login to your Oculus Developer Dashboard: https://dashboard.oculus.com/

How to enable Developer Mode for Oculus Quest?
Download and install the Oculus App to your Smartphone. Once installed, you need to login with your username and password – as registered with your Oculus Developer account and your associated Organization. Open your Application and go to
Settings–>select your Oculus Quest Device–>More Settings–>Enable Developer Mode
What drivers do I need using Unreal Engine UE4 to develop for the Oculus Quest?
There are two essential driver packages you need to download and install before you can start using Unreal UE4 and your developing process for the Quest. First, you need to install the Oculus ADB Drivers 2.0. And second, you need Nvidia CodeWorks for Android.
Android Developer Bridge – How to install Oculus ADB Drivers 2.0
This download contains the drivers required to use ADB with Android-based Oculus devices. Version 2 adds support for MTP mode connections.
To install the driver, unzip the package and right-click > Install the android_winusb.inf file on your PC. For more information, review the ADB documentation.
How to install Nvidia CodeWorks for Android
NVIDIA CodeWorks for Android installs all software tools required to develop Android and reduces the complex process of configuring an Android development system down to a single click. You can find all the latest releases directly from the Nvidia Source Page: https://developer.nvidia.com/codeworks-android
I recommend installing Nvidia CodeWorks directly from your Unreal Engine Folder, which can be typically found here:
C:\Program Files\Epic Games\UE_X.XX\Engine\Extras\AndroidWorks\Win64
Install CodeWorks Nvidia for Android within Epic Games Engine Folder – the installer is usually located here: C:\Program Files\Epic Games\UE_4.24\Engine\Extras\AndroidWorks\Win64
Check if Installation of CodeWorks was successful: Select This PC–>Right Mouse Click–>Properties–>Advanced System Settings–>Environment Variables

- Check Quest Device with ADB .\adb devices
- Check all Settings + Plugins
- Setup SDK and SDK License
- Install OVR Metrics Tool
- Download and extract – copy the .apk (shift+right click to the .apk file)
- open cmd box> adb install + copy and paste the path
- Library Source to launch the OVR Metrics Tool
How to setup your Oculus Quest Headset
Unreal UE4 Project Settings for Oculus Quest
This chapter contains many different sub-chapters and covers a lot of information you need to consider. The Unreal Project settings are the key to successfully deploying your builds to the Oculus Quest. I recommend you download my UNREAL GETTING STARTED PROJECT FILE.
This Unreal Project File contains all basic Project Settings needed to run your application specifically for the Oculus Quest, using Android and ES3.1
PROJECT SETTINGS – DETAILS
Unreal Documentation – Mobile Previewer ES3.1
Oculus Quest Development using Unreal UE4 Game Engine
Setup Unreal Engine for Android Development
- From the Unreal Engine Launcher, press the Launch button to open the Unreal Project Browser.
- From the New Project Categories section of the Unreal Project Browser, select Games, and click Next
- On the Select Template page, choose Blank project and click Next
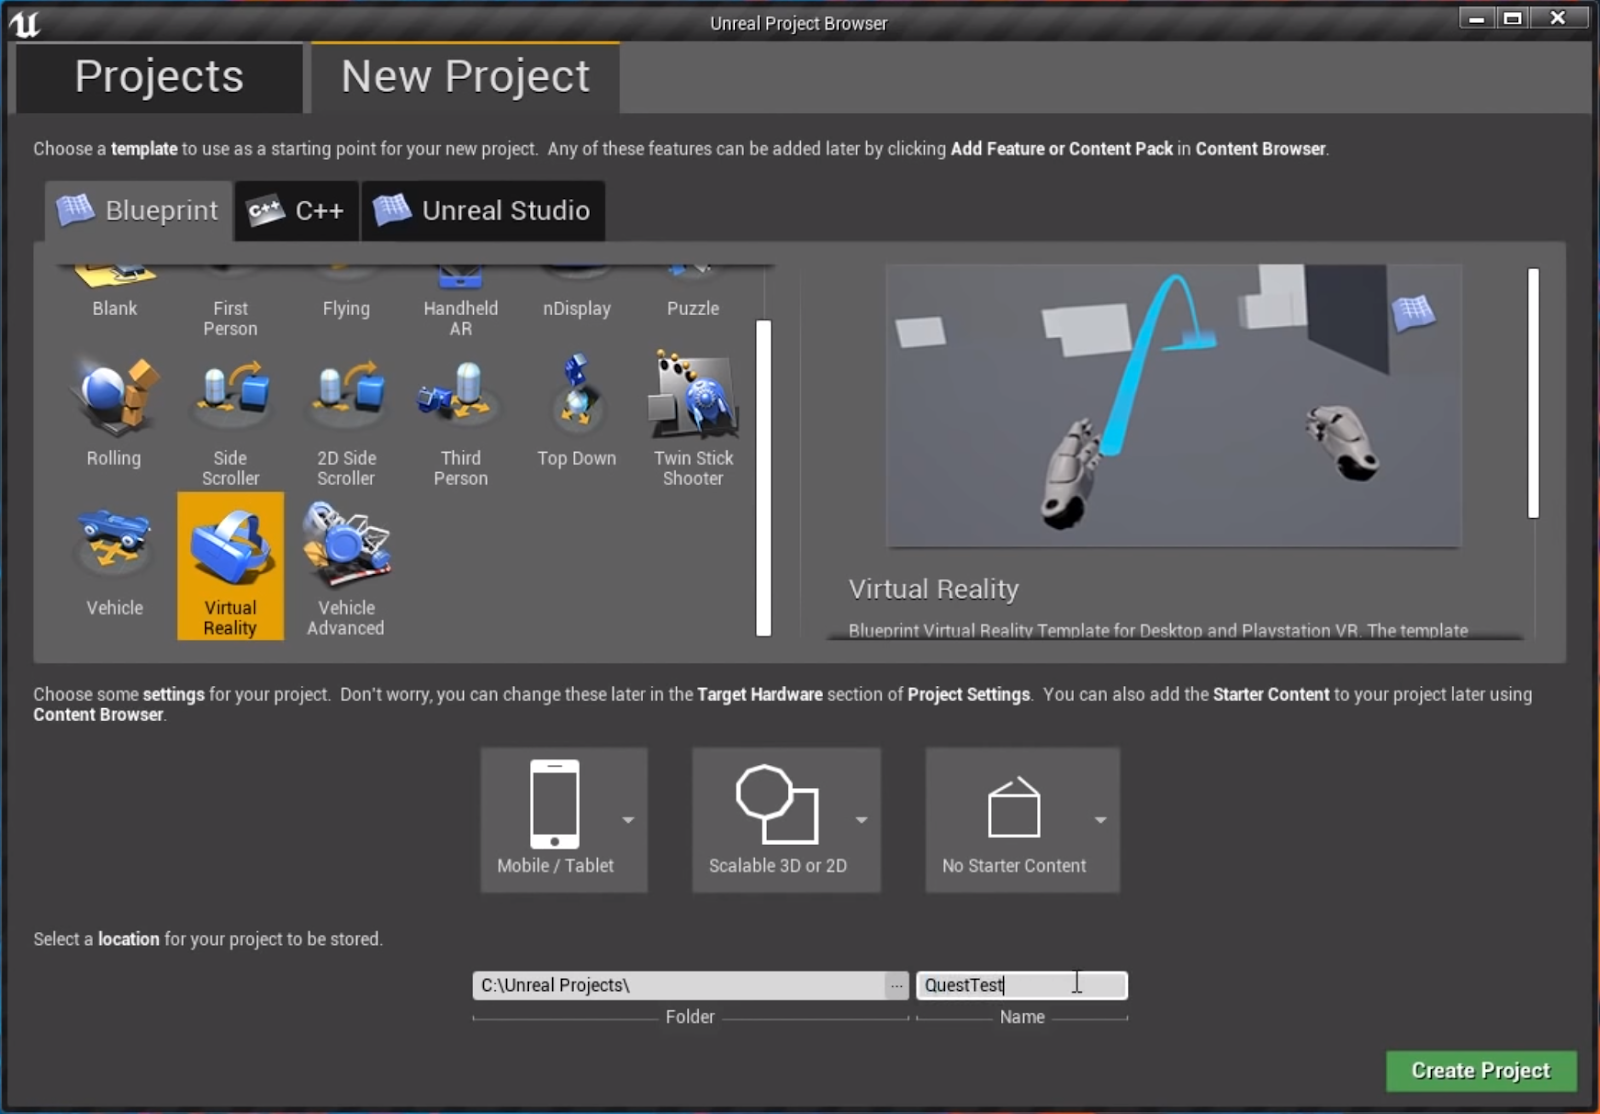
- For Project Settings, choose:
- Blueprint
- Mobile / Tablet
- Scalable 3D or 2D
- No Starter ContentAt the bottom of the screen:
- Set the folder location
- Set the project nameYour screen should look like this:
Create New Level + Save
Project Settings Maps: Select the New Level you created for the Game Startup Map and Editor Startup Map
Check OculusVR Plugin
Mobile Default Touch Interface: Set to None
Platforms–>Android–>Configure SDK
For Quest:
- Minimum SDK Version: 25
- Target SDK Version: 25
- Enable FullScreen Immersive on KitKat and above devices, check for True
Advanced APKPackaging –> Package for Oculus Mobile Devices. From the drop-down select Oculus Quest
Check Remove Oculus Signature Files from Distribution APK
Mobile HDR – make sure it’s turned off
Mobile MSAA – 8xMSAA
Forward Shading – True
Contact Shadow Length: 0.01

RHI: Set to DirectX12
Reflections: 2048
Clipping: 0.001
Mobile Multi View: True
Mobile Multi View Direct: True
Vulkan: True
Late Latching: True
Don’t use 32bit, 16bit textures – use ASTC Texture compression
Use parallax mapping instead of normal mapping.
Setting Up VR Pawn
Unreal Documentation: https://docs.unrealengine.com/en-US/Platforms/VR/SteamVR/HowTo/StandingCamera/index.html
Setup Level Blueprint: Executive Command Console: stat unit
stat engine
stat fps
Limit Tris per Level: 100k
Useful Video Resources:
Checking and Activating Unreals Built In Oculus Plugins:

Plugins: Oculus VR and Configuring Android Manifest
- Select Mobile
- Enable Multi-View (it’s instanced Stereo for Android)
- Enable Direct Multi View
- Mobile HDRI: Turn off
- Enable Fullscreen Immersive on KitKat and above: True
Checklist Summary for Unreal Project Settings and Configuration:
- Start in VR
- Reflection Capture: 512 (adjust for performance dependent on your scene)
- Forward Shading for Desktop: Not True
- Development is done with Shader Model 5 for Desktop and ES3.1 for Android
- Default RHI: DirectX12
- DirectX 11& 12 (SM5): True
- DirectX Mobile Emulation ES3.1: True
- Antialiasing: MSAA: true * I set maximum 8×8
- Instanced Stereo: Turn off [it’s Enabled by using Multi-View for Android. Note: It’s True when deploying to PC]
- Allow Static Lighting: True
- Postprocessing->Custom Depth-Stencil Pass: Disable (to expensive)
- Ambient Occlusion: Disable (for Real Time)
- Ambient Occlusion Static Fraction (AO for baked lighting): True [this is the baked ambient occlusion, which is not as expensive as the real time AO]
- Auto Exposure: Disable
- Motion Blur: Disable
- Lens Flares: Disable
- Bloom: Disable
- Separate Translucency: Disable
- Use Splitscreen: Disable
- Anti-Aliasing Method: For Mobile you want to have MSAA
- Target Hardware: Mobile | Scalable 3D or 2D
- Explicit Canvas Child ZOrder: True
- Mobile: Default Touch Interface: None
- Android APK Packaging: Configure Now
- Accept SDK License
- Minimum SDK Version: 25 or higher
- Target SDK Version: 25 or higher
- Support OpenGL ES3.1: True
- Remove Oculus Signature Files from Distribution APK: True
- ARM64: True
- Support Dash: True
- Compisites Depth: True
- FFR Level: High
- SDK Manifest: Oculus Quest

- Android SDK Path: every path needs to target your local NVPACK installation (watch my Video Tutorial: How to install Nvidia CodeWorks)
- Project Launcher: Advanced–> Select Quest–>Select By The Book
Note: the following features are only available when installing Unreal UE4 using the installer from https://github.com/oculus-vr/
Unfortunately, with today’s date 02/09/2020 the installer and the Oculus VR Plugin is not available anymore. The following plugin features can’t be used at this moment. Also noted: Those features have been mainly targeting PC.
- Supports Dash
- Composited Depth
- Splash Screen
- Oculus Performance Window

Recommendation:
- Disable ALL PostProcessVolumes
- Disable ALL Dynamic Lights (keep static lights if possible for max. performance)
- Mobile HDR: Disable
- Mobile Multi-View: True
- Mobile Multi View Direct: True
- Android SDK License: True (check license agreement and agree)
- Android SDK Versions: Current 25
- Oculus Mobile Device: + Oculus Quest
- FFR Level: Not available without the Oculus Plugin
Profiling for Mobile: -messaging -SessionOwner=%USERNAME%
(username is your PC Name)
Oculus Developer:
Loren McQuade
Email: mcquade@oculus.com
Installation of OVR Metrics tool
Latest Test-Development for the Quest:
update report 2020-02-13:
I figured out the problem with the black artifacts. When geometry is intersecting, the black artifacts appear. Forward Shading on or off and different AA Settings don’t change anything.
Solution: make sure you don’t have any intersecting geometry when building your world. I created an inside of the 3dsmax box, all vertices have been closed. It’s basically one mesh. I replaced the three primitive planes with the new box and clean unwrapped uvws.
Result: Clean edges and no AA issues.
MSAA Info:
When using MSAA, you can already use 8xMSAA. I saw a clear difference in the AA of the edges. However, in order to use MSAA you need to check the following three settings.
#1: Forward Shading: True
Keep in mind, MSAA only works when Forward Shading is activated.
#2: General Anti-Aliasing Setting:
Make sure it’s set to MSAA and not to NONE
#3: Mobile MSAA:
Make sure it’s also set to MSAA and not to NONE
WORLD SETTINGS
Precompute Visibility: True
Create Precompute Visibility Volume for the Focus Area of Calculation
Build–> Precompute Static Visibility [will launch Swarm Agent]
Show–> Visualize–>Precomputed Visibility Cells (will show you the cells in your Editor Viewport)
Ambient Occlusion: True
Lightmaps Resolution:
I personally select objects and set different resolutions for each objects Lightmap. Depending on the importance of my look – especially the shadows. For the packed Light and Shadow Map Texture I set the resolution to 4096.
Try to avoid Translucent Materials. When possible, use always Opaque instead. I recommend PBR-Shaders and no complex Shader Networks – instead, just texture maps connected directly to each input slot.
Check Max Shader Complexity within the Editor: View Mode–>Optimization View Mode–>Shader Complexity [Alt+8]
Color Green: Indicates Good
Color Red: Indicates Bad (Make proper adjustments)
BP Actor Ticks – a hidden Performance Boost
It’s possible to select specific performance-heavy actors within your editor and change the actor’s Ticks per Second. By default, it’s set to 0. This means this is the most expensive draw-call you can get. By increasing the value to 0.1 or even 0.5 (half a second) you gain already 50% performance for this particular actor.
Unreal UE4 – Adding a Push Button for the Virtual Reality Template
How to add a Push Button for your VR Game to trigger a specific event.


thanks a lot. 🙂